

I recently spent some time with Waves Curves Resolve, and after testing it in a few real-world mixing situations, I wanted to share my thoughts. This plugin sits in the same general category as tools like Curves Equator and soothe2, but after using it, I realized it actually approaches the problem a bit differently.
In this Curves Resolve review, I’ll go over how it feels in practice, what stood out to me, what didn’t, and where I think it really makes sense in a mix.
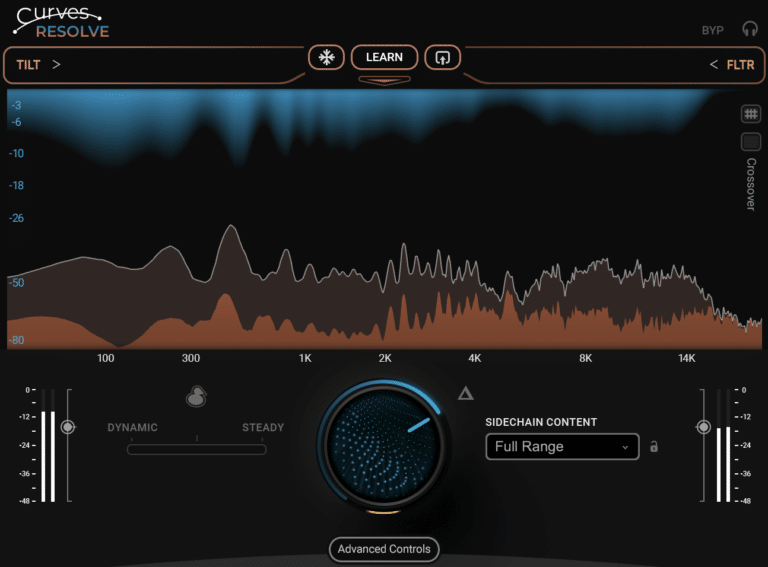
At its core, Waves Curves Resolve is a frequency unmasking plugin designed to reduce clashes between sounds using a sidechain. You put it on the track you want to control, feed another signal into the sidechain, and Resolve dynamically makes space where those two signals conflict.
If you’ve used Curves Equator or soothe2 before, you’ll feel at home right away. The concept is similar: analyze frequencies, detect masking, and reduce only what’s necessary.
What stood out to me, though, is that it doesn’t feel like a compressor when you’re listening. Instead, it feels like Resolve is using a different kind of processing to remove conflicting frequencies rather than compressing them in the traditional sense.
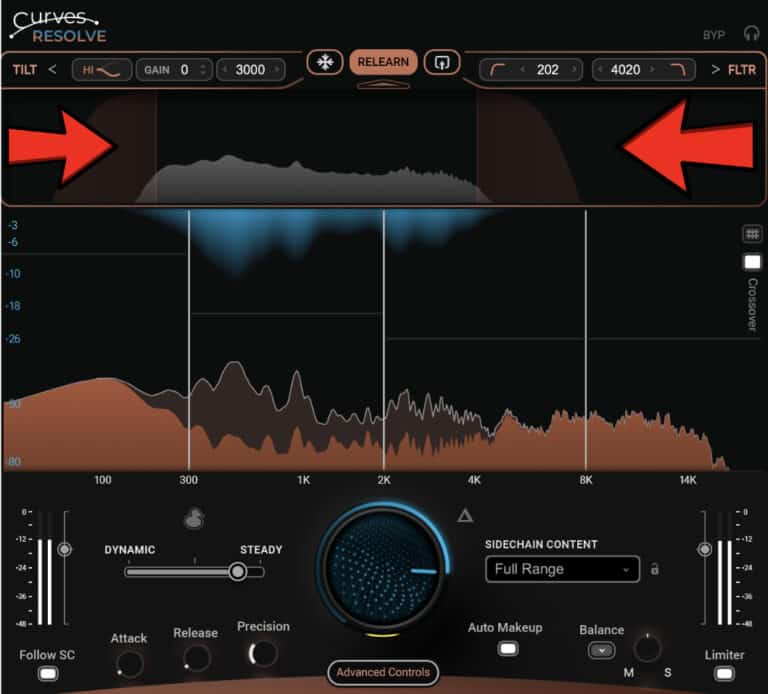
That said, Curves Resolve comes across as a multiband-focused tool rather than a fully free-form spectral processor. You’re working within four defined bands instead of shaping dozens of independent nodes. That structure makes it more guided and often faster to dial in, especially in real mixing situations.
In my workflow, I mostly used Resolve for vocal-to-music relationships and ducking scenarios.
This is where Waves Curves Resolve shines. I’ll put it on the instrumental bus and sidechain the vocal into it. As soon as you turn up the Main knob, you hear the vocal come forward—not because it’s louder, but because the masking is being reduced.
Compared to soothe2, Resolve feels a bit less flexible in terms of frequency detail, but it also feels more controlled and predictable. You’re not endlessly tweaking nodes; instead, you’re shaping how much each band reacts.
One thing I really like is the mid/side processing option. Being able to focus reduction more on the mid or side content is extremely useful, especially for vocals sitting in the center while guitars and synths live on the sides.
This feature alone makes Resolve stand out for me. It’s subtle, but it makes a real difference in dense mixes.
The Sidechain Content presets are surprisingly useful. Instead of starting from scratch every time, you can tell Resolve what kind of signal is coming in—vocals, drums, bass, etc.—and it sets up a sensible starting point.
The Ducker mode is also very interesting. Unlike traditional duckers that just push everything down, Resolve can either duck the full signal or intelligently unmask frequencies while still behaving like a ducker. It’s a nice hybrid approach that works great for dialogue, vocals, and voiceovers.
✔ Feels familiar if you’ve used Equator or soothe2
✔ More structured, multiband-style workflow
✔ Excellent mid/side processing options
✔ Sidechain Content presets save time
✔ Ducking mode is genuinely useful and flexible
✔ Transparent results when used correctly
It’s a plugin that encourages listening instead of staring at numbers, which I always appreciate.
Even though I like it, there are some limitations:
✘ Less band flexibility than soothe2
✘ Can feel restrictive for surgical work
✘ Easy to overdo if you push it too hard
✘ Not a one-click solution – You still need to dial it in
✘ Not a replacement for EQ or compression
If you’re expecting total spectral freedom, this might feel limiting. It’s more about controlled problem-solving than deep surgical editing.
Curves Resolve sits somewhere between a dynamic EQ, a multiband processor. It works similarly to Curves Equator and soothe2 in that it detects and targets individual problematic frequencies in real time, but the biggest difference I found is that Resolve feels more multiband-focused and less free-form.
To my ears, Curves Equator and soothe2 adjust frequencies in a more dynamic, compressor-like way. With Curves Resolve, the processing sounds different—less like compression and more like unmasking—especially on buses and dense mixes.
That won’t be for everyone—but personally, I like the structure. Add in the mid/side processing, the Sidechain Content presets, and the ducking options, and you get a plugin that’s practical, efficient, and very mix-focused.
One last important note: Curves Resolve is completely FREE for the first 48 hours after release, starting January 19, 2026. After that, it becomes a paid plugin, but you’ll still be able to try the full demo.
Grab it through this link → https://waves.alzt.net/e1y6OQ
If you’re looking for a clean, intelligent way to deal with masking—without going full surgical—Curves Resolve is definitely worth checking out.
This post includes affiliate links. If you decide to purchase through them, it helps support what we do—thanks for the support! 🙌
| Cookie | Duration | Description |
|---|---|---|
| cookielawinfo-checkbox-analytics | 11 months | This cookie is set by GDPR Cookie Consent plugin. The cookie is used to store the user consent for the cookies in the category "Analytics". |
| cookielawinfo-checkbox-functional | 11 months | The cookie is set by GDPR cookie consent to record the user consent for the cookies in the category "Functional". |
| cookielawinfo-checkbox-necessary | 11 months | This cookie is set by GDPR Cookie Consent plugin. The cookies is used to store the user consent for the cookies in the category "Necessary". |
| cookielawinfo-checkbox-others | 11 months | This cookie is set by GDPR Cookie Consent plugin. The cookie is used to store the user consent for the cookies in the category "Other. |
| cookielawinfo-checkbox-performance | 11 months | This cookie is set by GDPR Cookie Consent plugin. The cookie is used to store the user consent for the cookies in the category "Performance". |
| viewed_cookie_policy | 11 months | The cookie is set by the GDPR Cookie Consent plugin and is used to store whether or not user has consented to the use of cookies. It does not store any personal data. |